ARTICLE DATE:
11.30.05
Most of us with precious memories saved on analog media realize that these VHS, 8mm, and Hi8 tapes are slowly degrading. Fortunately, if you still have a device that can play your tapes and a DVD recorder in your PC, for under $100 you can convert these analog videos to DVDs—and those DVDs will have attractive menus and buttons that let viewers access key scenes.
The amount of equipment that you will need is not daunting. You'll want an analog deck, like your VHS player or camcorder, to send the video to a capture device, which you can control with a consumer DVD-authoring program such as Sonic Solutions' popular MyDVD, used for this article. In the authoring program, you can set capture and encoding parameters, choose and customize your menu, capture the video, and record the DVD on a standard DVD recorder.
Any consumer video-editing program can capture video and produce a DVD. What distinguishes MyDVD and similar programs, such as Ulead MovieFactory and Pinnacle Instant DVD Recorder, is the ability to convert tapes to DVD in a single step, so you can set a few parameters, roll the tape, walk away, and return to a finished DVD. If you have, say, 50 VHS tapes to convert, you'll really want this level of automation.
Some readers will already have all the necessary equipment, but others may need to go shopping. For the latter, let's take a closer look at what equipment you will need.
Equipment Needs
There are three basic approaches to converting your tapes. The least costly is to use your computer and a separate capture device, either capturing directly to MPEG-2 and converting to DVD in a single step, or capturing to DV format, editing your video, and then producing your DVD. Or you can buy a standalone device that can convert analog video directly to DVD without a computer.
 |
Both computer-related options require an analog deck to play the original tape. As mentioned above, your old camcorder or VHS player will do, but if you're buying new, look for a deck that's compatible with your tapes and that offers S-Video output (rather than composite only), since S-Video has superior detail and color. If you'll be working with older tapes, consider a deck with an internal time base corrector (TBC), which removes jitter from the video and produces a cleaner signal. Also, consider a deck that can record in Super VHS mode, which produces higher-quality VHS tapes than plain VHS decks. That way, if Aunt Sally asks for a VHS copy of the DVDs you're creating, you'll be sure not to disappoint her.
JVC's SR-MV40U deck meets all these requirements, so we used it as the source deck for our tests of analog capture devices. Interestingly, it also contains an internal DVD recorder, and can copy VHS tapes to DVD without a computer. We discuss the strengths and weaknesses of this device, and of the other two capture devices we mention, at capturequality below.
If you plan to convert directly from tape to DVD, you'll get the best blend of video quality and performance with a device that uses internal chips to convert your video into MPEG-2, the format used by DVDs. We tried the JVC SR-MV40U in its standalone mode, and it produced very good-quality video in our tests. The ADS DVD-Xpress ($99.99 direct), an external analog capture device that we connected to our computer via USB, also produced very good-quality video while capturing to MPEG-2 in real time.
In contrast, the Canopus Corporation's ADVC300, also an analog-to-digital capture device, converted the analog signal into DV format, which it transferred to the computer via a FireWire connector. Then, during capture, MyDVD converted the incoming DV video into MPEG-2 on the computer, but the quality was inferior to that produced by the DVDXpress and the SR-MV40U.
 |
Interestingly, if we captured the DV stream in MyDVD and converted to MPEG-2 afterwards, the quality was virtually identical to that produced by the DVDXpress and the SR-MV40U. That's because when converting to MPEG-2 during capture, MyDVD uses an algorithm that optimizes for speed, rather than quality. When it's not encoding in real time, MyDVD optimizes for quality, with a noticeable improvement.
If you intend to capture and edit your video and then produce your DVDs, you should capture in DV format, which has better quality than MPEG-2 and is easier for most computers to process. For this, you can either buy a device (such as the Canopus ADVC300) that converts analog input to DV format, or use your DV camera if it has analog input capabilities. You'll need a FireWire connector or adapter card in your computer.
Computer Requirements
Video encoding is very demanding, so a fast computer will shorten the process. If you're capturing in MPEG-2 format, hard-drive requirements are relatively modest, about 3.6GB per hour of video captured. This jumps to a total of about 17GB per hour when capturing in DV, 13GB per hour for the original DV video, and then 3.6GB per hour for the rendered video MyDVD will record onto the disc.
If you have an older, single-layer DVD recordable drive, you might consider upgrading to a drive that supports dual-format (+R/RW and �R/RW) single and dual-layer recording. These drives record as fast as 16X and cost under $150. Though dual-layer discs are more expensive than single-layer media, they provide a better one-disc solution for converting 2-hour VHS tapes. Test early to make sure these dual-layer discs play on your living room DVD player, because they are less likely to be compatible than single-layer media.
Setting Up
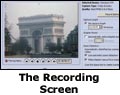
Since we converted from tape to DVD without editing, we captured with the ADS Tech DVDXpress, which attaches to the computer via a USB 2.0 port. We then connected S--Video and stereo audio output cables from the JVC SR-MV40U deck to the DVD Xpress. We also connected the JVC unit to a TV so we could watch our progress, primarily to help debug potential problems with the capture device and to use when cuing the tapes.
MyDVD has generic video input controls, which lets you pick a capture device and set compression parameters, but not adjust the input settings for the analog capture device. For this, we ran CapWiz, the program ADS bundles with DVDXpress, where we chose the S-Video input and previewed the video to make sure that the color and brightness were acceptable. Then we closed CapWiz and ran MyDVD.
Off to See the Wizard
With MyDVD running, click Tools | Direct-To-DVD in order to start the conversion process. Your first option is menu style; if you don't like the default style, you can choose a different look from MyDVD's still and motion templates. You can also customize the font, font size, and all other menu parameters, including adding a custom background image, audio background, or animated buttons.
Choose a name for your project ("Paris 1985," say), which will appear as the title on all menus. If you have multiple recorders on your system, choose the target drive and number of copies. Insert a blank disc into the drive, since MyDVD checks for the disc when you click Next to advance to the recording window.
 |
Working from the top down, click Record Settings and choose the desired quality from the three alternatives: Best MPEG-2 (8.0 Mbps, which corresponds to about 70 minutes of video on a single-layer disc, or 130 for a dual-layer disc); Better MPEG-2 (6.0 Mbps, 120 minutes single-layer, 210 dual), and Good MPEG (4.0 Mbps, 240 and 415 minutes respectively). Most Hollywood titles are produced at between 6 and 8 Mbps. You'll get the best quality at 8 Mbps, but 6 Mbps may be acceptable for some videos. In contrast, 4 Mbps will almost certainly show some visual artifacts, such as fuzziness, blocks, or "mosquitoes" that appear to follow characters around the screen. Given the importance of the content and that DVD-recordable media costs under $1 per disc, you should probably produce your DVDs at 8 Mbps or 6 Mbps, if necessary using multiple discs in order to fit the content from a single tape.
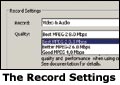 |
If you have more than one capture device on your system, you'll next have to choose the device on the Record Settings screen in the Video Device drop-down list. If your capture device doesn't have integrated audio capture, you'll have to choose the audio device and input; if this option is grayed out, it's because your capture unit has integrated audio. Once you select your capture quality and your video and audio capture devices, click OK to return to the record screen.
The next option is Capture Length, or the duration MyDVD will record before stopping to finalize the disk. It's a good idea to enter a duration, even if you decide to stick around and manually enter chapter points. That way, if you get distracted, MyDVD will stop recording at your selected time.
The last four options relate to chapter points, or scenes in your videos that MyDVD can link to menu buttons, just as commercial DVDs link to specified scenes. MyDVD offers three options for creating chapter points: You can automatically add one at specified intervals, click the space bar to create scenes manually, or use automatic scene detection.
The strengths and weaknesses of the first two options are obvious; periodic scene detection breaks up the video nicely, but probably won't provide exact access to any desired scene. Manual chapter-point insertion lets you pre-cisely insert chapter points, which is great for later viewing, but requires your presence during the playback of the video.
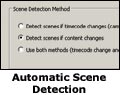 |
Automatic scene detection sounds lovely, but often is dicey in practice. When converting from VHS tapes, MyDVD must detect scene changes based upon content changes in the video. On a four-day ski vacation, for example, with video shot both during and apr�s skiing, MyDVD would probably detect changes between the day and night shots. But if you shot two hours of video during a visit to the Grand Canyon, MyDVD might not detect any scene changes. Though MyDVD lets you adjust the sensitivity to scene changes, it's an inexact science. If you boost sensitivity too high, MyDVD might detect 120 scenes in a two-hour tape, which is less convenient than having chapter points every 10 minutes. Though scene detection is worth experimenting with, unless the scenes in your video are clearly differentiated visually, your results may be unsatisfactory�and you won't know until the disc is done.
Your final option in the recording screen is whether MyDVD should make chapter menus for each scene. If you check this box, MyDVD creates as many menus as necessary to display all your chapter points, using the first frame of the chapter point as the video thumbnail on the menu. If you don't, MyDVD will insert the chapter points in the video stream, but the only way that someone viewing the video can access them is via the shuttle control on their DVD player.
After setting all options, start your VHS player and click MyDVD's red Start Capturing button. If you've set the capture duration, the program will capture for that duration, and then create all necessary menus and burn the DVD. If you stop the capture manually, MyDVD will also start the DVD creation process. You can't use this wizard to capture multiple scenes in a single DVD; once you stop the first capture, MyDVD goes on to produce the DVD.
Consider organizing your tapes chronologically before you start, and then take notes of the dates, events, and location of chapter points as you convert each tape. MyDVD has a labeling program you can use to create liner notes to help viewers find the key scenes.
Though the prospect of dealing with dozens of old home movies may seem daunting, most families only film happy occasions such as vacations, weddings, birthdays, and graduations. This presents a rosy view of those years, and you may be surprised at the good memories this process revives.
(From www.pcmag.com/article2/0,1895,1892657,00.html 2006-03-18)
ARTICLE DATE: 11.30.05
When converting VHS tapes to DVD, you have many alternatives, ranging from analog capture devices that work with your computer and DVD recorder to consumer appliances like the JVC SR-MV40U (retail $440) that convert in a single step. We wanted to find out if any solution delivered significantly better quality than the others.
To test this, we produced MPEG-2 files with three devices: the SR-MV40U, ADS Tech's DVD Xpress ($99.99 direct), and Canopus Corp.'s ADVC300 ($549 direct). We captured directly into MPEG-2 format with the JVC deck and ADS DVD Xpress. The ADVC300 captures in DV format, not MPEG-2 directly. As mentioned in the article, although MyDVD can convert DV input into MPEG-2 format in real time, it uses an algorithm optimized for speed, not quality, so we recommend against this. Instead, you should capture in DV/AVI format, and then convert to MPEG-2 in non-real time, which is how we produced the test videos from the ADVC300. During capture, we used default settings for color, filters, and other adjustments on all products.
We tested four scenes from four different tapes, comparing both still image quality and comparative quality during real-time playback, with the Canopus unit leading slightly in both categories. In addition, Canopus's device-control software enables a range of sophisticated filtering and image adjustments, making it a natural choice for advanced users.
The ADS Tech DVD Xpress delivered very good quality and offered real-time capture to MPEG-2, making it a great choice for consumers converting their analog libraries to DVD. ADS Tech bundles one-step analog-to-DVD conversion software and a standard DVD authoring program with the unit, so it's a complete package. This unit tended to fade the videos slightly during capture, a problem that you can fix with the unit's brightness and contrast adjustments before you begin. Also, it's a one-way device, with analog inputs but no outputs, so you can't write video back to tape after editing.
The JVC SR-MV40U produced very good-quality video that was almost indistinguishable from that of the ADS unit; the JVC deck, however, doesn't provide software brightness and contrast adjustments. Still, the SR-MV40U converted multiple tapes to DVD without error, all in real time, with only a short finalization routine necessary to play the DVDs on a normal player.
While you can combine multiple tapes onto a single disc, with each appearing as a separate button on a primitive menu, the unit inserts chapter points at five-minute intervals in the finished movies. This provides a convenient mechanism to scan through the videos, but you can't create custom links to specific locations in the video as you can with MyDVD.
The SR-MV40U served as a high-quality source deck for our other capture trials, with its internal time base corrector reducing the jitter on several older VHS tapes. The unit produced good-quality VHS tapes when converting DVDs to analog tape. This range of capabilities makes the SR-MV40U an attractive alternative for those who'd rather use an appliance than their computers to convert tapes to DVD.
The lesson from our tests seemed clear: While you can eke out small quality improvements with different devices, there is no magic bullet for obtaining dramatically better results.